Monday, August 31, 2009

Happy Harvest

I am very excited to share today's card with you! It doesn't happen often when the idea in my head and the execution match up! I can't wait any longer!


The inspiration for this card came from Amy's Blog Hop card. I loved the idea of the swirling fall leaves and my mind immediately went to stitching them (yes, we've created a monster). I started by stamping the leaves from Beautiful Blooms in fall colors and cutting them out. Then I stamped Background Basics: Text Style in Chamomile Vintage Touch Tea Dye Ink onto my main image. I inked the stamp up unevenly on purpose to give it a faded, weathered look.

I used a pencil to lightly draw the swirl lines that I planned to stitch. Let's just say I didn't quite follow them exactly, but I got the general idea. I added the leaves, adhering them with foam tape. Then I matted the main image with a piece of Autumn Abundance patterned paper. This is hands-down my favorite patterned paper collection from Papertrey yet. I inked the edges with more of the Vintage Touch Tea Dye Ink, using both Chamomile and Chai this time.

The Happy Harvest sentiment is from Vintage Picnic. I hope you love this card as much as I do! Please scroll down and check out Friday's card too - those little pumpkins are so stinkin' cute!

I hope you have a great day! Thank you for stopping by!

#Anya

Recipe:
Stamps: Beautiful Blooms, Background Basics: Text Style, Vintage Picnic - Papertrey Ink
Cardstock: Vintage Cream - Papertrey Ink
Patterned Paper: Autumn Abundance - Papertrey Ink
Ink: Spring Moss, Ripe Avocado, Pure Poppy, Scarlet Jewel, Lemon Tart, Summer Sunrise, Chamomile and Chai Vintage Touch Tea Dye Duo - Papertrey Ink; Pumpkin Pie, Really Rust, Creamy Caramel, Close to Cocoa - Stampin' Up!

Other: Machine stitching

Friday, August 28, 2009

You Make Me Smile!

So does this card! I love, love, love vintage Halloween, and these little pumpkins with their silly grins scream vintage to me. They are so adorable!


The pumpkins are from Twick or Tweet, a new Stampin' Up! set in the Winter Mini catalog (these items are available for purchase starting September 1). I stamped the pumpkins onto Really Rust and Enchanted Evening Cardstock. I cut them out and layered them onto a piece of Vintage Cream that had also been stamped with the image. I was a little irritated with the sentiment not stamping clearly but decided I sort of liked it paired with the distressed-looking patterned paper. Does anyone else have trouble using wood-mounted stamps after using clear stamps?

I was practicing my sewing again, stitching three different strips of patterned paper together. I added a few other touches - trimmed the bottom of the image with my pinking blade, added some buttons, and inked the edges. Love it! I think I'll leave this out on my desk so I can look at it and smile! :)

I hope you have a great night and a wonderful weekend. I need to spend some time doing nothing.. we'll see.

Thanks for stopping by!

#Anya

Recipe:
Stamps: Twick or Tweet - Stampin' Up!
Cardstock: Vintage Cream, Enchanted Evening - Papertrey Ink; Really Rust - Stampin' Up!
Patterned Paper: Polka dot stripe (Spellbound) - Making Memories; Gingham (Autumn Abundance) - Papertrey Ink; Spotted Damask (Vintage Moon) - Pink Paislee
Ink: True Black, Chai Vintage Touch - Papertrey Ink
Other: Rotary cutter pinking blade - Fiskars; Buttons; sewing machine

Thursday, August 27, 2009

Holiday Cheer

When December rolls around, I will be glad that I was on a holiday card kick in August!

The Moxie Fab World Blog has me thinking Christmas recently, and here is a cute little card that I popped out last night. I had clean and simple in mind.. go here to check out other participants in the Moxie Fab World Blog clean and graphic holiday style challenge!


The finished card size is a little unique: 3-1/4 by 5-1/2. (Ok, I confess. The real reason I decided to size the card this way is so that I only needed to stamp the branches from Rustic Branches once across the card. Not that the clear stamps aren't really simple to line up, but only having to stamp them once is really simple!) Unusual sized cards are fun sometimes!

The sentiment is from Holiday Wishes. The rhinestones were originally clear, and I colored them with a Copic marker to match the Scarlet Jewel ink. That's about it! Very easy to mass produce for Christmas!


I am feeling so proud of myself at this point - I usually wait until some time in December to finally get started on my Christmas cards! I am having fun getting started early, so hopefully I'll have a nice big stash by the time the holidays roll around. Thank you for stopping by - I hope you have a perfect evening!

#Anya

Recipe:
Stamps: Rustic Branches, Holiday Wishes - Papertrey Ink
Cardstock: Scarlet Jewel, SS White - Papertrey Ink
Ink: New Leaf, Scarlet Jewel - Papertrey Ink; Handsome Hunter - Stampin' Up!
Other: Clear adhesive rhinestones; Copic marker

Wednesday, August 26, 2009

RSCC 15

Hi everyone! Hope your day is going great - I meant to post yesterday, but the day got away from me... it was my birthday! I was enjoying myself, so I'm not really sorry I didn't blog! :)

Today's card is for Dawn's RSCC 15. I was inspired by the non-traditional Christmas colors that are popping up in patterned paper. I thought I'd take Dawn's colors and see what sort of holiday card I could pull off! Here are the challenge colors:

I used Papertrey Ink's Melon Berry, Rustic Cream, Hibiscus Burst, and Spring Moss.


The snowflakes are from Snowfall and Snowfall Additions. The different sizes of snowflakes were stamped onto Rustic Cream in the challenge colors. Then I stitched the Melon Berry and Hibiscus Burst snowflakes to add a little texture (and to give me an excuse to play with the sewing machine again. Seriously, I'm addicted - you can click the picture for a larger version). I added coordinating buttons and stitched a border. The sentiment is from Vintage Picnic Sentiments.

Hope you enjoy! It was fun to make a holiday card using these colors and think of new ways to add stitching to my cards! Have a great night, and thank you for stopping by!

ETA: I added this card to the Moxie Fab World Blog 'fun and cute' holiday project challenge - please go check out the other participants here!

#Anya

Recipe:
Stamps: Snowfall, Snowfall Additions, Vintage Picnic Sentiments - Papertrey Ink
Cardstock: Vintage Cream, Spring Moss - Papertrey Ink
Ink: Melon Berry, Hibiscus Burst, Spring Moss - Papertrey Ink
Other: Melon Berry and Hibiscus Burst Vintage Buttons - Papertrey Ink; machine stitching

Monday, August 24, 2009

Fabulous Sparkly Flower

Hi everyone! The weather is fantastic here today. Sunny, mid-70s with just a hint of breeze. I have my office window open and am enjoying the fresh air.

I have a folder of card photos that I have not yet shared, so that's where today's card is pulled from. Many of these cards were made for the latest Paper Crafts magazine call and were not picked up (despite my disappointment, I feel obligated to keep trying). One of the categories was to include shiny/sparkly projects, and I put this together.


The design is pretty straightforward, so I'll save most of the details for the recipe. I colored the flowers (from In Bloom) with Copic markers and then covered it in Martha Stewart fine crystal glitter. It doesn't look so rainbow-y as sugar-y. Make sense?

The Diamond Lace border punch is from EK Success. I put an adhesive rhinestone over each punched diamond. Regardless of what PC thinks, I love this card. In Bloom is a fantastic set.

I had a busy weekend including a showing of Harry Potter and the Half-Blood Prince, dinner at the Georgetowne Inn, a trip to Foxburg, PA and fun with photography. It was wonderful, but I missed being home.

See you tomorrow! Thank you for stopping by.

#Anya

Recipe:
Stamps: In Bloom, Friends 'Til the End - Papertrey Ink
Cardstock: Melon Berry, Spring Moss, Vintage Cream - Papertrey Ink
Ink: Ripe Avocado - Papertrey Ink; Rich Cocoa Memento - Tsukineko
Other: Fine Crystal Glitter - Martha Stewart Crafts; Diamond Lace border punch - EK Success; Clear adhesive rhinestones - Michaels; Copic markers

Friday, August 21, 2009

New Beginnings

Happy Friday everyone! I am so excited for the weekend. We have some special things planned, as next week is my birthday!

I really love today's card!

The main image is from Serendipity Stamps and is called Winter Fenceline - I encourage you to click the link and check it out. I decided I wanted to try to make it a spring card, so I stamped the image, colored it appropriately and then covered those bare trees with Sweet Pea Flower Soft. What do you think? I think it looks great!

The cardstock is Spring Rain stamped with the grid from Guide Lines. The patterned paper is from the 2009 Bitty Box Basics collection. The sentiment, New Beginnings, is from the Birds of a Feather set. I added some other touches to finish it off.

I love it!

I hope the sun shines for your weekend. Thank you for stopping by!

#Anya

Recipe:
Stamps: Winter Fenceline - Serendipity Stamps; Guide Lines, Birds of a Feather - Papertrey Ink
Cardstock: Spring Rain, Berry Sorbet, Vintage Cream - Papertrey Ink
Patterned paper: 2009 Bitty Box Basics (Berry Sorbet) - Papertrey Ink
Ink: Rich Cocoa Memento, Versamark - Tsukineko; Vintage Photo Distress Ink - Ranger
Other: Copic markers; Paper piercer; Sweet Pea Flower Soft

Thursday, August 20, 2009

Autumn Abundance

What a crazy day.

Our dog Luca got stung by a yellow jacket (One? More than one? We don't know) this morning and had a reaction to it. To make a long story short, I spent an awful lot of money and time at the vet's office. For a while there she was doing ok, and then her face started to swell! She is doing better now, resting after an anti-histamine shot, but what stress from a tense day.

Anyway, on to the card! My Papertrey Ink order arrived last night and I couldn't wait to break out the new Autumn Abundance set, which includes three solid line images that are perfect for coloring. I used the pitcher full of autumn leaves.

The image was stamped with Rich Cocoa Memento ink onto Vintage Cream cardstock and then colored with Copic markers. I used a white gel pen to highlight the acorns. The sentiment, also in the set, was stamped in Memento right on top of the colored image.

The image was stitched to the mat layer, which was also stitched. I can't tell you how excited I am to finally be sewing on my cards! I have learned to sew before - my mother was a bridal seamstress in college and continues to be a phenomenal seamstress. She has taught me how to use the sewing maching before and finally gave me a refresher the evening before last (really, I can handle the sewing part but can't remember how to thread the thing to save my life!). Anyway, I couldn't wait to try it out and knew from the beginning how I was going to incorporate it on this card. The card base is Dusty Durango, my favorite of SU!'s new In Colors. The finished size is 4-1/4" square. I envision a cute little notecard set with each of the images from this set in fall colors. Fun!

Thank you for taking the time to stop by today. I appreciate your visit!

Take care!

#Anya

Recipe:
Stamps: Autumn Abundance - Papertrey Ink
Cardstock: Vintage Cream - Papertrey Ink; Dusty Durango - Stampin' Up!
Ink: Rich Cocoa Memento - Tsukineko; Antique Linen Distress - Ranger
Other: Copic markers; Heidi Swapp distresser; white gel pen -Uniball; sewing machine

Wednesday, August 19, 2009

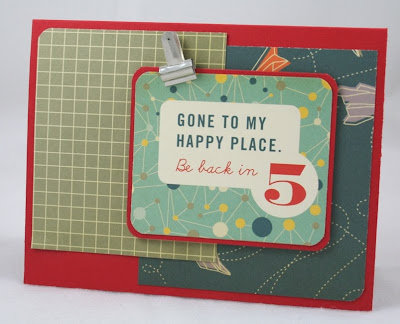
Happy Place

About a month ago, I was lucky enough to win a contest on Cosmo Cricket's blog for their new patterned paper lines. (I thought I was only going to receive one, which was such a treat, but they sent all three!) Cosmo Cricket's Paper Crafting Kits are fabulous - filled with stickers, borders, and elements (journaling blocks or little phrases) in addition to their great paper. (Can you tell I'm a fan?) Anyway, here's a card I made using The Boyfriend Line.

This couldn't have been easier! I used the Driver's Ed and Study Hall papers, and the main image is from the Elements sheet. I rounded a few corners, added a little clip, and matted it on PTI Pure Poppy.

Hope you enjoy - I think I'll head for my happy place now!

Have a great night!

#Anya

Recipe:
Cardstock: Pure Poppy - Papertrey Ink
Patterned Paper: Driver's Ed, Study Hall, Elements (The Boyfriend) - Cosmo Cricket
Other: Clip Assortment - Stampin' Up! ; corner rounder - EK Success

P.S. - Thanks for bearing with me while I was being a bad blogger. Work was goofing up my schedule and I just didn't have time. I hate that, but I'm back on track now.

I also took some time and made a few changes to the ol' blog... what do you think? I like it!

Tuesday, August 18, 2009

SSDT Challenge 3!

Good morning! Welcome to the third challenge for the Serendipity Stamps Design Team! Our theme this month was monochromatic - here is what I came up with (you can click the photo for a larger view).


I have always loved the look and simple elegance of a white card. I used brand new stamps from Serendipity's Fall/Winter release:

I embossed each of these images with JudiKins Pastel Embossing Powder onto PTI White cardstock. I also used some White Shimmer cardstock (PTI) to mat the embossed piece.

The sentiment was matted on a larger piece of cardstock, which I had scored a line along the top and bottom edges. I love how simple and easy this is to do, yet it adds something special. I finished the card off with some rhinestones and ribbon.

This card was simple to make and would be easy to mass-produce for beautiful, elegant Christmas cards (it is never to early to get started)!

I am so glad that you stopped by today, please visit the other wonderful Serendipity Stamps DT members and see what they did for our challenge!

Amy
Jennifer
Kathie
Kelli
Lynda
Shannan
Sue
Yvonne


And don't forget to stop by the Serendipity Stamps store to see the entire collection of new stamps and the SS Blog and Gallery to see what else we've been up to!

Have a great day!

#Anya


Recipe:
Stamps: Snowflake Flourish Large, Snowflake Flourish Small, May Your Heart Be Filled - Serendipity Stamps
Cardstock: SS White, White Shimmer - Papertrey Ink
Ink: Versamark - Tsukineko
Other: Pastel Embossing Powder - JudiKins; Silver Sheer Metallic Edge Ribbon - Papertrey Ink; Clear Adhesive Rhinestones; ScorPal

Tuesday, August 11, 2009

Fab Friend

Hi everyone! How are you doing?
Today's card is for Dawn's RSCC #14. Here are the colors this time:


It is funny, I just made a note of a very similar color combination that I saw in the most recent issue of Country Living Magazine. I really like the purple and scarlet together.

Here's what I came up with, a little fun using Mod Squad.


The flowers were stamped in Scarlet Jewel and cut out. I added some pink rhinestones for a fun touch. The glitter is from Martha Stewart and is more of an icy look than sparkly. That is about it - pretty easy.

So I submitted a handful of cards to Paper Crafts Magazine for their most recent call, so we'll see what happens. I will share my submissions with you over the next few weeks.

I hope you have a wonderful night. Thank you for taking some time to stop by today. Take care!

#Anya


Recipe:
Stamps: Mod Squad - Papertrey Ink
Cardstock: Scarlet Jewel, Raspberry Fizz, Plum Pudding, Vintage Cream - Papertrey Ink
Ink: Scarlet Jewel, Plum Pudding - Papertrey Ink
Other: Adhesive rhinestones - K&Company; Crystal fine glitter - Martha Stewart Crafts; Embossed circle border punch - EK Success

Monday, August 10, 2009

What's Cookin'?

Sorry for being such a bad blogger! My schedule last week got goofed up and I wasn't really able to squeeze in time for blogging. I have also been busy creating for some current magazine calls, so we'll see how that progresses.

I am going to share a project with you today that is planned for my next upcoming Stamp Camp. I like these fun projects - it allows my campers to use some different products and make something they can use or gift. I think these would make a great shower or house-warming gift.


The front and back covers are cut using the Curved Rectangles Nestabilities. The covers are patterned-paper-covered paperboard (recycle your cereal boxes!) There are three section dividers made using PTI's Recipe Box stamp set. The inside pages are simply 4" by 6" index cards...no need to re-invent the wheel! I used the Zutter Bind-it-All to make the book. Other goodies finish it up, and my campers will have the option of selecting from different products for their finished design.

Thank you for stopping by today, I will be back with something new tomorrow!

Have a great night!

#Anya


Recipe:
Stamps: Recipe Box - Papertrey Ink
Cardstock: SS White - Papertrey Ink; Certainly Celery - Stampin' Up!
Patterned Paper: Summer Picnic - Stampin' Up!; Red dot - Making Memories
Ink: Dark Chocolate - Papertrey Ink; Antique Linen Distress Ink - Ranger
Other: Curved Rectangles Nestabilities - Spellbinders; Bind-it-All - Zutter; Scalloped and classic circle punch - Stampin' Up!, Green Sparkly Thickers - American Crafts; Diamond Lace border punch - EK Success; Buttons; Twine

Tuesday, August 4, 2009

Zoo Baby

Just enough time for a quick post today. My sister-in-law is expecting a baby boy in September and she asked me if I could put together a baby announcement for her. I was honored, and I got to work. She had picked up a stamp set (Mindy's Zoo from Autumn Leaves) that she wanted to use. I thought little boy, and this is what I came up with.


The patterned paper is from a Stampin' Up! retired pack. The colors were exactly what I was hoping - sort of on the 'boy' side, but not overly so.

I stamped the mama and baby giraffes on the patterned paper and cut them out. The sentiment is from Papertrey Ink's Bitty Baby Blessings. This would be easy to switch up colors (or animals - the set is full of cute baby zoo animals) for any theme.

She loved them, and I've been cutting out patterned giraffes ever since!

Thanks for stopping by, I hope you have a great night!

#Anya


Recipe:
Stamps: Mindy's Zoo - Autumn Leaves; Bitty Baby Blessings, Forest Friends (grass) - Papertrey Ink
Cardstock: Bashful Blue, Sahara Sand - Stampin' Up!; SS White - Papertrey Ink
Patterned Paper: Delicate Dots Designer Series Paper (SAB 2009, retired) - Stampin' Up!
Ink: Certainly Celery, Bashful Blue - Stampin' Up!; True Black - Papertrey Ink
Other: Circle punches, Two-way glue, Dazzling Diamonds glitter, Linen thread - Stampin' Up!; button

Monday, August 3, 2009

Baby Boy Onesies

Monday already? I hope you had a great weekend - my husband and I are officially Advanced Scuba Divers, having completed the last of our skills for that certification level. Now it is planning (and saving) for our 2010 trip to Australia.

I have another gift to share with you today. Another thing I really like to make (easy and fun) are stamped baby onesies. PTI has so many images that work well for these - Pond Life and Forest Friends are two of my favorite sets to use.


I used Palette Inks for these, sometimes I heat set with an iron when I am done and sometimes I don't. I don't know that it makes a difference, honestly.

These are great gifts and also are a great item for craft shows. Easy to customize as well!

It has been a few days since I have visited my stamp room, so I am hoping to do that tonight. Good therapy, which I could use.

Hope you have a wonderful evening, and I hope to see you tomorrow!

#Anya

Recipe:
Stamps: Forest Friends, Pond Life - Papertrey Ink
Ink: Pure Poppy, Ripe Avocado, True Black - Papertrey Ink; Orangerie, Beaux Arts Blue - Palette Hybrid Ink
Other: Baby onesies - Gerber (Target)